Wednesday, December 9, 2009

Cook N for the Holidays: Chocolate Walnut Fudge


Pretty darn good. Pretty darn quick. Pretty darn easy.

Made some fudge today: Cook's Illustrated's Chocolate Walnut Fudge.

This recipe makes about 2 1/2 pounds of yummy, rich, chocolatey goodness.

The people at Cook's Illustrated recommend Ghirardelli semisweet and unsweetened chocolate. I could not find unsweetened in this brand, so used some green and blacks unsweetened powder instead (6 Tablespoons mixed with 2 Tablespoons of Canola oil- and it worked just fine). The walnuts are "crucial" to the texture of this fudge, so if you don't like nuts (or have an allergy) this may not be the recipe for you.


A few notes from CI:


  • Make sure to remove the fudge from the double boiler before the chocolate is fully melted. If the chocolate stays in the double boiler too long, there is the possibility of the chocolate separating and producing a greasy fudge.


  • This fudge will change texture and become drier the longer it is stored. Store the fudge, tightly wrapped in plastic, in a cool place for up to 2 weeks or in the freezer for 3 months. If frozen, allow ample time to let it reach room temperature before cutting.


Cook's Illustrated Chocolate Walnut Fudge


Ingredients
16 ounces semisweet chocolate , chopped fine
2 ounces unsweetened chocolate , chopped fine
1/2 teaspoon baking soda
1/8 teaspoon table salt
1 (14-ounce) can sweetened condensed milk
1 tablespoon vanilla extract
1 cup coarsely chopped walnuts

Instructions
1. Cut 12-inch length extra-wide heavy-duty aluminum foil; fold edges back to form 7 1/2-inch width. With folded sides facing down, fit foil securely into bottom and up sides of 8-inch-square baking pan, allowing excess to overhang pan sides. Spray foil with nonstick cooking spray.

2. Toss chocolates, baking soda, and salt in medium heatproof bowl until baking soda is evenly distributed. Stir in sweetened condensed milk and vanilla. Set bowl over 4-quart saucepan containing 2 cups simmering water. Stir with rubber spatula until chocolate is almost fully melted and few small pieces remain, 2 to 4 minutes.

3. Remove bowl from heat and continue to stir until chocolate is fully melted and mixture is smooth, about 2 minutes. Stir in walnuts. Transfer fudge to prepared pan and spread in even layer with spatula. Refrigerate until set, about 2 hours. Remove fudge from pan using foil and cut into squares.

TO MAKE DOUBLE BATCH:
Line 13 by 9-inch pan with two sheets of foil placed perpendicular to each other and double amounts of all ingredients. In step 2, use large heatproof bowl and Dutch oven containing 4 cups simmering water.

Sunday, December 6, 2009

Cook N by the Book : Charles Virion French Country Cookbook


Decided that I should start to use my cookbooks on a more regular basis....I have about a bazillion of them. Unfortunately, I have not cooked from a large number of them. I was thinking that this is just wrong of me- to hoard these books and not use them....

So once a week I vow to pull out a cookbook and make something new.

Tonight I cooked from Charles Virion's French Country Cookbook. My copy is quite tattered. I picked this up at a thrift store for $2.99. This is the first recipe that I have used from it.

Roast Loin of Pork with Piquant Sauce

Piquant Sauce

3/4 c ketchup
1/2 c water
1/2 c dark corn syrup

1 8oz can Tomato Sauce

1/2 c wine vinegar

1/2 c brown sugar

1 t chili powder

1 1/2 tablespoons cornstarch

6 tablespoons Cointreau.


I used a 5lb pork roast for this recipe. Browned it, and then put it in a shallow baking pan with a little olive oil for 1.5 hours at 325 degrees.


Combine in a sauce pan the ketchup, water, corn syrup, tomato sauce, wine vinegar, brown sugar and the chili powder. Simmer over low heat for 10 minutes.


Blend cornstarch with 4 tablespoons of the simmering mixture and then add it to the rest of the sauce. Cook slowly and stir until slightly thickened.


Add the Cointreau, continue stirring. Simmer gently for 20 minutes and then set aside.


Reduce the oven temperature to 250 degrees. Transfer pork loin from shallow baking pan to covered baking dish. (You can use throw potatoes into the roasting pan and combine them with the pork drippings if youd like roasted potatoes)


Pour 1/2 of the piquant sauce over the pork roast, cover and return the pork to the cooler oven for .5 to 1 hour.


10 minutes before serving, pour the remaining piquant sauce over the roast.


I served the roast with roasted dutch potatos, green beans and granny smith apples spirals that I sauteed in butter, then added a bit of sugar and nutmeg to. I recommend the apples! They go great with the pork.


Friday, November 27, 2009

Messing with Holiday Traditions

Happy Black Friday!

No, we will not be venturing out for a stressful day of consumerism today. It may surprise many of you, but Simon and I completed our Christmas shopping last weekend.


Some may view our rebellious shopping habit in the same light as they view stores that play Christmas music the day after Halloween. We view this as a way to reduce the stress of the holiday season. I find the crowds more tedious than festive. The long lines make the process oh so inefficient, and because we also shop with a list and a budget, the objective of getting a fabulous deal on anything is not a huge priority in our shopping equation (however, we did find a few very good deals this year, just the same!)

It wasn't always this way. Growing up, this was what the women of my family did the day after Thanksgiving. My mom and sister and I piled into a car (or two) with grandma and aunts and girl cousins and spent the day shopping at the mall. I don't know for certain if Black Friday has become more aggressively marketed and sinister today than back then, but it did seem more tolerable when I was younger..spending time with cousins, not really having a budget or an extensive gift list to adhere to, and living in a smaller town may all have contributed to the carefree shopping day I fondly recall.

As we grow older, it is just a part of life that our holiday traditions change. I think it is imparative that we do allow the old to shape the new. We should hold onto those traditions we cherish. We should accomodate the traditions of the new people in our lives, and we should not feel bad for creating new traditions that are more in line with our lifestyles.

For us, these changes mean shopping before the Christmas rush,sending out Christmas cards (it is an English thing) and, more often than not, actually being in England on the blessed day. Foodwise, Christmas now means mince pies and trifle, and watching the queen's speech...but I still like to have Grandma's cream puffs and to make divinity on those years we stay home. The orange and nuts in the bottom of our Christmas stockings is still required.


One modified tradition that I regret this Thanksgiving holiday is that we did not spend it with family. For me, I think this is one of those holiday traditions that should not be messed with.

We have had several changes over the past year - loved ones passing away and our son moving out of the house. Simon and I started the season with several plans for Thanksgiving: It started with hosting the event...then we decided that we were going to visit Jake in Boise...then we found out that Jake had to work and would not be available to us during our stay in Boise.

Resigning ourselves-reluctantly- to a dinner for two, we decided, first, that we would go to Palisade Restaurant.

Then one of us came up with a hairbrained idea that a four day holiday from work might be a great opportunity to detox and feel lousy for a few days. (The other person is much too accomodating for his own good, don't you think?) So we didn't make the required early reservation at Palisade.

Thankfully, while taking a quick trip to the grocery store on Tuesday to grab JUST an onion, Simon and I came to our senses and decided to prepare a romantic banquet for two. We left the store with $150 worth of groceries and enough food to feed both of our families and, I think everyone in our small town.

Lesson: It is not easy to make a small Thanksgiving feast.

There is another diversion from holiday tradition that I do not regret this year (apart from the shopping one, of course). Instead of pumpkin pie for dessert, I made a Bourbon Chocolate Macadamia nut tart. (I can't believe I ever thought about doing a detox!) It was so good, but it saddened me that I did not have family around to share it with.

I don't know why, but I have always been a bit intimidated by tarts...after making this one, I am over that fear. It was so easy!

This recipe is from Martha Stewart's Holiday 2009 special issue (on newstands now, and filled with some really great sweets!)

Chocolate Macadamia Nut Tart
Makes one 11-inch tart

1/2 cup sifted all-purpose flour, plus more for dusting
Pate Sucree (or use your favorite pie crust recipe)
2 large eggs
1 cup sugar
1/2 tablespoon bourbon
1/4 teaspoon salt
3/4 cup unsalted butter, (1 1/2 sticks), melted and cooled
6 ounces semisweet chocolate, chopped
2 1/2 cups unsalted whole macadamia nuts, (10 1/2 ounces)

Directions
1.Heat oven to 400 degrees. On a lightly floured surface, roll pate sucree into a 14-inch circle. Fit pastry into an 11-inch tart pan; trim dough evenly along edges. Use trimmings to patch any thin spots in shell. Refrigerate 30 minutes. Meanwhile, in a large bowl, whisk eggs, sugar, and bourbon until combined. Whisk in flour, salt, and butter; stir in chocolate. Pour mixture into chilled tart shell. Cover top with nuts, pressing them halfway down into filling.
2.Bake for 10 minutes. Reduce heat to 350 degrees. and continue baking until crust and nuts are golden, about 35 minutes. If tart gets too brown, place aluminum foil over top for remainder of cooking time. Cool on wire rack.


HAPPY HOLIDAYS!

Saturday, November 7, 2009

Bake N 4 Jake: November Cookie of the Month - Dangerous Chocolate Peanut Butter Cup Cookies


This month's cookie is a Dangerous Chocolate Peanut Butter Cup Cookie.

I found this recipe in a Redbook magazine years ago, and made them for Jake quite often when he was younger. It is a chocolate and peanut butter cookie base with chocolate chips and chopped peanut butter cups in every bite. These have the texture of a peanut butter cookie and -with 3TBS of batter per cookie- they are definately big enough to satisfy a hungry college student. Jake is home this weekend, so I thought I better whip these up so he can take them home with him.

After tasting one of these again, I must say I had forgotten how very good they are. These definately are a not something that you want around your house if you are suffering from an empty nest and a slower metabolism. If this sounds like you, I recommend that you file these under your "dangerous" recipes and bake them only when you know you will have people around to help you devour them!

(See the "nutrition" information at the bottom of the recipe- I think this is why they taste so good!)

Monday, October 26, 2009

Bake N 4 Jake: October Cookie of the Month - Snickerdoodles


How can you not love a cookie with a name like "snickerdoodle"?

This month I am sending Jake a dozen snickerdoodles. The recipe is the same that my dear grandmother used to make. She would follow a recipe from a little brown pamphlet published in 1958 by WSU. I do not know what happened to her copy and, truthfully, it never crossed my mind again until a few years ago.

I was out browsing antiques and vegetables at a produce stand in Yakima a few years back and came across the little brown pamphlet in a stack of old recipe booklets. My first reaction was a hopeful, "could it be?", and you can imagine my joy at finding the tell-tale recipe for snickerdoodles within.

A note on Jake: He is attending BSU and working lots of hours. He told me that this is his life now....school, work, eat, sleep...repeat. I think it would sound a lot better if he could just throw a few snickerdoodles into that routine, don't you?

Saturday, September 26, 2009

Cook N Soup: Spanish Garlic Soup


Years ago, I wrote an essay for my college nutrition class on the healthy properties of garlic. I remember it well because it was one of my first college papers, a topic I enjoyed researching, and sadly the teacher gave me an F on it because she didn't think it wasn't "scientific enough". She did give me the opportunity to rewrite for a better grade, but I was in the middle of a divorce and finals at that point and I had just gotten a lay off notice at work (an especially bad week!) and I could not be bothered. I took a "C" in the class and moved on.


Like many of my college papers it was misplaced over the years, but a few points of garlic interest come to mind:

  • Garlic is an antioxident, antiseptic and antiinflammatory.
  • An immigrant friend of mine said that mother's in her very poor Mexican neighborhood used to serve their children garlic by adding it to milk because it would stave off infection and illness.
  • An old superstition says that if you want to deter an unwelcome suitor you simply sprinkle crushed garlic at an intersection and lure the unsuspecting to cross over it.

This is another soup from the Williams Sonoma Best of Taste cook book.

The book suggests that it is more appropriate to serve this soup as a starter, than as a full meal. I would agree with that.

Honestly, it didn't exactly knock our socks off, but it was a new recipe and its ingredients: olive oil, almonds, garlic and baguette, did make it sound tempting and - undeniably- very healthy.

The soup contains just 4 cloves of garlic, and that is the prominent flavor you experience. I served the soup with a spinach salad, some extra baguette and chorizo sausages (not shown). Simon went back for seconds -which could have just meant that he was hungry- but definately, it is an indication that the soup is palatable.

I am hearing several of my facebook friends and family complain this week that colds are hitting their homes as the weather is changing and fall is in the air. This soup may be just the ticket for keeping the bugs at bay.


WILLIAMS SONOMA: SPANISH GARLIC SOUP

Ingredients:

2 cups chicken stock

1 bay leaf

1/2 teaspoon dried marjoram

1/4 cup blanched almonds, whole or slivered

4 garlic cloves, chopped with a pinch of kosher salt

4 egg yolks at room temperature

3/4 cups olive oil

1 teaspoon sherry vinegar

1/2 stale baguette, torn into chunks

Directions:

In a saucepan, combine stock, bay leaf, marjoram, salt and 3 cups water. Bring to a boil and simmer for about 5 minutes. Strain and let cool slightly.

In a food processor, pulverize almonds. Add garlic and puree. Add egg yolks and process to blend. With themachine running, slowly add oil to emulsify. Stir in vinegar.

Add 1/2 cup stock to the almond mixture in the food processor and process to blend. Pour the almond mixture back into the stock. Portion soup into bowls, garnish with bread and drizzle with good extra virgin olive oil.

Saturday, September 19, 2009

Bake N 4 Jake: September Cookie of the Month - ANZAC Biscuits


It is difficult for me to believe that my "baby" just turned 19- where on earth does the time go? Today he is a grown man. Attending Boise State and working prep in a small restaurant there. Simon and I are just beginning to adjust to this whole empty nest thing.


Jake came home for a quick trip last week, We went out to lunch and went shopping for his birthday, picked up a few "staples" (socks, underwear, a couple of sporty shirts...), and I decided to enroll him in the "cookie of the month club" whereby I bake and send him a batch of homemade cookies each month. As far as I know, Jake has never met a cookie he didn't like, and I thought this would be a great way to let him know on a regular basis that I am thinking about him.


This month I threw together one of his favorites : ANZAC Biscuits.
The story of ANZAC biscuits is that they were sent to loved ones in the Austrailian and New Zealand Army Corp during WWI.

This recipe for ANZAC Biscuits is from Martha Stewart's Cookies cookbook. These oatmeal and coconut cookies turned out really nice and they are puported to travel well too.


Ingredients
Makes about 3 dozen.

2 cups all-purpose flour
2 cups rolled oats
2 cups sugar
1 cup desiccated coconut
1 cup (2 sticks) unsalted butter
2 tablespoons Lyles Golden Syrup
3/4 teaspoon baking soda
1/4 cup boiling water

Directions
1.Preheat the oven to 350 degrees. Line baking sheets with parchment paper, and set aside. In a large bowl, combine flour, oats, sugar, and coconut. Set aside.
2.In a small saucepan over medium heat, melt butter with syrup. Dissolve baking soda in boiling water, and add to butter mixture. Stir to combine. (Be careful; if the butter is hot, it will bubble up considerably.)
3.Add butter mixture to dry ingredients, and stir to combine. Using a 1 1/2-inch ice-cream scoop, drop onto prepared baking sheets, about 2 inches apart (be sure to pack the scoop tightly so the mixture doesn't crumble). Flatten cookies slightly with the heel of your hand.
4.Bake until golden brown and firm but not hard, about 15 minutes. Transfer to wire racks to cool.

(I will put them in the mail on Monday, Jake! Love, Mom)

Saturday, September 12, 2009

Keep It Simple Saturday: One Great Foodie Site.


While I had intended for this Keep It Simple Saturday post to contain simple recipes, I am taking a bit of a detour this week to share with you a helpful little website I discovered yesterday...
The website is called foodgawker.com.
When you arrive on the site, you can search on any food item that you might have in abundance this time of year (zucchini, tomatoes, pears...) and you will get a pages of pictures extracted from food sites all over the web that contain recipes for your searched item.
Try it out and let me know what you think.

Wednesday, September 9, 2009

Cook N Soup: William Sonoma Cream of Tomato Soup with Pancetta


The bad news is that the weather has turned a bit colder this week. The good news is that colder weather and soup go very well together. I suddenly have an urge to pull out the crock pot and bake bread.

My mother sent us home yesterday with a huge quantity of home grown tomatoes and I cannot think of a better way to use them up than to make soup! I have made this particular tomato soup a few years ago when I had my own bountiful garden of ripe tomatoes. The recipe for croutons with pancetta and gorgonzola have been served many times over the last few years with salad and other types of soups, but they are a must have with this soup.

This is a recipe adapted from a William Sonoma cookbook. I added a bit more sugar and cream in my version and used a blender to puree the soup.

Cream of Tomato Soup with Pancetta

Ingredients:

4 thin slices pancetta, chopped
2 Tbs. olive oil, plus more for brushing
3 garlic cloves, chopped
1 onion, chopped
3 1/4 lb. tomatoes, quartered
1/2 tsp. sugar
1/2 tsp. red pepper flakes
1 Tbs. finely chopped fresh marjoram
1/4 cup Arborio rice
1/4 cup heavy cream
Salt and freshly ground pepper, to taste
4 baguette slices
1/4 cup crumbled Gorgonzola cheese
Directions:
In a large pot over medium heat, fry the pancetta in the olive oil until crisp, about 3 minutes. Remove with a slotted spoon. Set aside.

Reduce the heat to low. Add the garlic and onion and sauté until translucent, about 3 minutes. Add the tomatoes, sugar, red pepper flakes and marjoram. Bring to a simmer and add the rice. To provide enough liquid for cooking the rice, add 1 to 2 cups water, depending on the juiciness of the tomatoes. Cook until the rice is tender, about 20 minutes.

Place a food mill over another large pot. Transfer the soup to the food mill and puree. Reheat over low heat and stir in the cream. Season with salt and pepper.

Preheat a broiler. Brush the baguette slices with olive oil and top each with 1 Tbs. of the Gorgonzola. Broil until the cheese bubbles. Top each with some of the pancetta. Ladle the soup into warmed bowls and serve each with a Gorgonzola and pancetta-topped baguette slice. Serves 4.

Adapted from Williams-Sonoma TASTE Magazine, Garden Varieties, by Sara Deseran (Fall 2001).

Saturday, September 5, 2009

Keep It Simple Saturday: Chocolate and Bacon


You may think after reading this week’s simple Saturday combination, that I have taken things a bit too far this week. “Chocolate and Bacon?” you say, “what will they think of next?”

However, I am always willing to try new things. Even if they sound a bit strange, and especially if they include chocolate. This week I am highlighting Vosges Haute Chocolat “Mo’s Bacon Bar”

I first read about Vosges Haute Chocolat in 2006 while staying at the Four Season’s in Las Vegas (on one very luxurious and romantic weekend away with my man). I was sitting by the pool, reading the Four Seasons magazine (while sipping a fru fru drink and being misted with Evian by a very handsome pool boy) when I came across an article on Vosges. Being in a very pampered, very luxurious state of mind, I was immediately drawn to chocolat (with no e) and it seemed- at that moment - all that was really missing from my life might have been a good box of chocolats.

Vosges is not just chocolat…it is chocolat with exotic ingredients. Suffice to say, there are ingredients in this chocolat from all over the world that I had never even heard of. The gourmand in me was intrigued. I told Simon that all I really wanted for my birthday was a box of Vosges Haute Chocolat.

This is not inexpensive chocolat. The specific package that piqued my interest most was a fairly diverse assortment of about 20 candies…for $60 (plus shipping and handling).

It seemed a bit extravagant, and at the last minute I decided against it. (okay, secretly, I was hoping he would surprise me…but I recognize he is not a mind reader and he did get me a nice necklace that year)

So- fast forward 3 years to now. Simon and I like to shop at a store in Mill Creek called Central Market. This is a fabulous market that we reserve for special occasion shopping. It is easy to spend a lot of money there because they have so much good stuff. I end each visit at this store in the chocolate aisle, where I pick up several pieces of good quality chocolate. Always a few Fran’s macadamia nut gold bars and always something new.

You can imagine my delight to discover that Central Market now carries a small assortment of Vosges chocolat bars. These bars are .5 ounces and they cost $2.50 Still a bit pricey, but cheaper than a latte. (I find that I generally gauge my indulgences by whether or not they are more expensive than a coffee at Starbucks).

Mo’s Bacon Bar smells of chocolat and bacon. It contains applewood smoked bacon bits and alderwood smoked salt covered in deep luxurious milk chocolat. The flavor is better than you would expect. Salty and smokey and sweet. Very Interesting.
I shared the bar with my mother. She thought it tasted pretty good as well and expressed my sentiment exactly when she added “there really isn’t much that doesn’t taste good covered in chocolate…bacon…ants…yum”

Tuesday, September 1, 2009

Recipes to Rival - August: Asparagus and Lemongrass Risotto

This was my first Recipes to Rival challenge and my first attempt at risotto.


All in all, it was a great success. The lemongrass and the asparagus are a nice combination.

This was a dairy and gluten free risotto. Very flavorful despite the absence of cheese. While the goal of this challenge was vegan, I could not serve my meat-and- potato-loving hubby tofu and expect to get a favorable review...I also cannot have it for health reasons. I used pine nuts instead of peanuts. The risotto was very nice with a piece of wild salmon and we had leftovers the next day for lunch which was wonderful.

In the future I might try this with different vegetables- I saw one post with zucchini that sounded great, and I might sneak in some parmasean (don't tell anyone)


Asparagus & Lemongrass Risotto
by Isa Chandra Moskowitz & Terry Hope Romero from Veganomicon

"Risotto is a traditional Italian rice dish. It is also one of the most common ways of cooking rice in Italy. Its origins are in North Italy where rice paddies are abundant. While this is not a traditionally prepared risotto, it is pretty close. You really want to use Arborio rice, but you can substitute any short grain rice and get a similar dish."

Asparagus and Lemongrass Risotto
Time: 1 hour 20 minutes Serves 4-6
This one does have peanuts in it, so if you are allergic, just leave them out. Personally, I liked pine nuts in it best. Fresh lemongrass is available in most grocery stores, but if you can't find it, you can use dried. If using dried, you will want to use a cheese cloth or tea strainer. Place the dried lemongrass, ginger and garlic. Don't worry about the heat of the serrano pepper, it only adds a nice hint of flavor.

Lemongrass Broth:
3 cloves garlic, whole and unpeeled
1” piece fresh ginger, sliced into ¼” slices
1 small stalk lemongrass, or 1 TBSP dried, chopped lemongrass
3 cups vegetable broth
3 cups water
3 TBSP tamari (or soy sauce, or more broth)

Risotto:
½ cup cooking sherry or white wine (D'Aquino Pinot Grigio is a good choice, any dry white wine, or just water)
1 lb asparagus
2 TBSP vegetable broth
1 cup basil leaves (Thai, if you can find it), sliced into thin strips
2 TBSP chopped fresh mint
6 large shallots, thinly sliced
4 cloves garlic, minced
1 serrano red chile, sliced very thinly (or ½ – 1 tsp crushed red pepper flakes)
1 ½ cups Arborio rice
1 tsp sugar (optional)
2 TBSP lime juice
Chopped roasted peanuts and lime wedges, for garnish (you can use pine nuts or sliced almonds instead of the peanuts)

1.If using fresh lemongrass, peel away and discard any brown stems from the stalk. Slice the stalk in half lengthwise and cut into 3” to 4” lengths, then julienne.
2.Give the garlic and the ginger a could whack with the side of your knife, keeping them whole. Prepare your herb pouch, if using.
3.Place all of the broth ingredients in a large stockpot and bring to a boil, then lower the heat and simmer for 10 minutes. Strain the broth, discarding the vegetables and herbs. Pour the broth back into the pot, cover and simmer over as low a heat as possible to keep warm.
4.Slice the asparagus into ½” pieces, removing any tough parts from the bottom of the stem. Separate the tips from the stems and place each in separate bowls.
5.In a medium-sized heavy-bottomed pot, saute the asparagus in 1 TBSP vegetable broth over medium heat until bright and crisp tender, 5 to 6 minutes. Add the basil and mint, saute for 30 seconds, remove from heat and set aside.
6.Add the remaining tablespoon vegetable broth to the pan. Saute the shallots and garlic, stirring occasionally, until shallots are very soft, about 6 to 8 minutes. Stir in the serrano and rice, saute for about 8 minutes, until the rice smells slightly toasted. Add the cooking sherry (or white wine) and stir constantly until the liquid is absorbed.
7.Now, time for relaxation and stirring. Get a glass of your favorite beverage, turn on some soothing music, or a good movie. Ladle about ½ cup of the broth at a time into the rice, stirring constantly until each addition is absorbed. Stir and cook until the rice is creamy but still somewhat firm in the center.
8.When the broth is almost gone, stir the sugar and lime juice into the remaining broth before adding it to the risotto. You may add more water or vegetable broth in ¼ cup increments if needed. This will take about 35 minutes.
9.Stir the asparagus stems into the risotto and cook for another 5 to 10 minutes, until the asparagus has reached desired tenderness.
10.Garnish each serving with the asparagus tips, chopped roasted peanuts, and lime wedges.

Saturday, August 29, 2009

Keep It Simple Saturday: Clotted Cream

When I think of cream, I think of England...


I did not really develop an appreciation for cream until after I tasted my first scone with strawberry preserves and Devonshire clotted cream.


Clotted cream is one of those special little delicacies that is readily available in England, but harder to find in the U. S. Most of the people that I share it with have never heard of it before. It is an essential ingredient if you are hostessing a cream tea. And I guarantee that once you have it on a scone with strawberry jam, you will not be willing to have another scone without it. It is quite heavenly.


Clotted cream looks like butter, but it should not be lathered upon a scone like butter. Dress the scone with your favorite preserves and then dollop the clotted cream on top.


This is a simple recipe because it requires only one ingredient: CREAM.


You can use any good quality cream for this, I use heavy whipping cream because it is carried in most every grocery store.


The process of turning your cream into "clotted cream" is also very simple, but it takes some time. I like to make mine the evening before I plan to use it. This will give it time to set up in the refrigerator. To make clotted cream you will need a double boiler, a spoon and a small bowl.


Clotted Cream


1c Good quality cream (or Heavy Whipping Cream)


  1. Pour the cream into the top of a double boiler set over water that is simmering.


  2. Wait patiently


  3. As the cream heats you will see a light yellow crust that starts to form on top. With a metal spoon skim the crust from the cream and deposit it in the small bowl.


  4. Repeat steps 2 and 3.


You will find that you can go and work on other activities while waiting for your cream to crust. Come back and check on it throughout the evening and keep skimming until you have about 3/4 cup of crust in your bowl. I will generally pour the remaining quarter of a cup into the small bowl when I am finished and then place the bowl in the refrigerator. Do not worry if the consistency seems too thin...By morning you should have a nice batch of thickened clotted cream for your scones.


Thursday, August 27, 2009

Daring Bake N : August Challenge: Dobos Torte

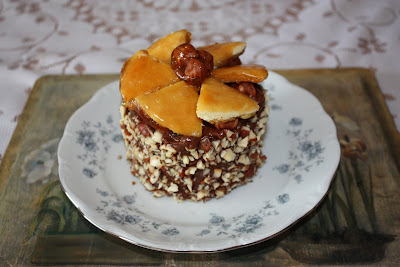
Well if I knew you were coming, I would have baked you a cake like this one....


The August 2009 Daring Bakers' challenge was hosted by Angela of A Spoonful
of Sugar and Lorraine of Not Quite Nigella. They chose the spectacular Dobos
Torte based on a recipe from Rick Rodgers' cookbook Kaffeehaus: Exquisite
Desserts from the Classic Caffés of Vienna, Budapest, and Prague.


The Dobos Torta is a five-layer sponge cake, filled with a rich chocolate buttercream and topped with thin wedges of caramel. (You may come across recipes which have anywhere between six and 12 layers of cake; there are numerous family variations!) It was invented in 1885 by József C. Dobos, a Hungarian baker, and it rapidly became famous throughout Europe for both its extraordinary taste and its keeping properties. The recipe was a secret until Dobos retired in 1906 and gave the recipe to the Budapest Confectioners' and Gingerbread Makers' Chamber of Industry, providing that every member of the chamber can use it freely.


As you can see above, I made two small cakes by cutting the recipe in half. Me and Mr Cook are watching our waistlines (grow, unfortunately) and we certainly did not need any rich Hungarian desserts lying around to tempt us.

I added a bit of grand marnier to the sponge and used some fine dark chocolate that Simon brought me from Luxembourg to chocolatify (new word) the buttercream. The sponge and the buttercream frosting were heavenly. The hazelnuts were also a nice touch.


The challenging part of this "challenge" was applying the thin carmel layer.

But for me, the most challenging part of the carmel was eating it, not spreading it. It was a little to stickey for my new implants (let me clarify here : dental implant, I only have the dental type!) and frankly the thought of eating more carmel after I finally pried the first taste off of my dentrifices caused me a bit of stress. I don't think I was alone in this- other DB's had the same complaint.

Overall- a very nice cake if you remove the carmel top. I would definately consider experimenting with a softer carmel in the future. This cake was a bit time consuming as well. I think I would save the recipe for a special occaision.

If you would like a copy of the recipe let me know.

Saturday, August 22, 2009

Keep It Simple Saturday: Chipotle Mayonnaise


A little over a week ago, I attended a cooking class at the Pacific Culinary Studio. This was one of those things that I had wanted to do for a while, but with school and work...and a hundred other excuses...I just didn't fit it in.


But this time, I called up a few of my foodie fiends ("r" intentionally removed here) and scheduled the tapas and sangria class. The chef of the evening was Conni Brownell, owner of The Charmed Radish .


It didn't take a lot of prodding to get the fiends to come along when "sangria" was mentioned. Lisa and Shelli were immediately "in". Chrissy-on the other hand- was not given a proper invite as she was on vacation and we were sure that no amount of fiendishly good company would be enough to tear her a way from the beach in Hawaii where she (no doubt) was savoring other tropical libations. We didn't want to put her in a position where she might have to decide between tropical vacation with hubby and fiendishly good time with sangria and girlfiends...(tough one!). We will definately insist on your attendance next time, Chrissy.


Back to K.I.S.S. post:


While many great little tapas were shared, one particular simple concoction stood out for me enough that I have prepared it no less than 3 times since class (less than a week and a half ago).


Conni served up this simple Chipotle Mayonnaise to accompany some very delicious corn fritters. I have served this with taco salad, as a dip for sweet potato fries (the best!) and as an amazing topping for chipotle and manchego cheese burgers.


This mayonnaise has a smokey-sweet flavor. All 3 fiends in attendance gave it a thumbs up. I am sure you will find many uses for it. You will definately want to give it a go with sweet potato fries!


The Charmed Radish Chipotle Mayonnaise


1/2 c mayonnaise

1 TBSP canned chipotle chilies in adobo, minced (or to taste)

2 tsp adobo sauce from chilies (or to taste)

1/4 tsp fresh lime juice

1 tsp of brown sugar or honey (or to taste)***


Mix the ingredients well...you can make this more spicy, smokey or sweet depending upon what tastes right to you!


***the addition of brown sugar or honey was a recommendation that Conni added to the recipe on class night- I definately prefer it this way.


Let me know what you think! What else would it taste good with?


Thursday, August 20, 2009

Just a little warning...

How do I tell you this?

I was driving home from work today...the sun was shining...I was minding my own business, listening to the radio and thinking about barbequing burgers tonight... when, suddenly, out of the blue... one very red...very bold...little whisp of an autumn leaf...leapt from its perch upon a branch overhanging my path....twirled and floated downward...stopping only for the most brief second before my windshield (to taunt me, I think)...and then disappeared.

It looked very much like this.....


....only it was alone.
Consider yourself warned...if you have summer type stuff to do...better get 'er done now! Autumn is coming.

Sunday, August 16, 2009

Sunday Cook N: Tropical Chardonnay Cake


Three things you should know about me:


1) I am trying desperately to balance my love of dessert and good food with my need to get in better physical shape (I am sure I am not alone in that pursuit!)


2) While I love things made from scratch- I am not above enhancing a product that comes in a box. I do eat mostly unprocessed foods, but every now and again I come across something new that I just have to try...


3) Wine is something that usually isn't leftover in our home.


So Sunday's dessert should be pretty easy to explain now.


I decided to allow myself dessert on Sundays. Simon and I spent the entire week working out on our Wii Fit to balance the calorie upswing from that delicious spanish rice the other night and a few other delightful courses this week.


I bought this bottle of Cabernet Cake mix a few months back while at a conference at Skamania Lodge in Southern Washington because I liked the packaging and thought "Cabernet in my cake sounds good"


Surprisingly, I had some leftover chardonnay from our Spanish rice night. I prefer red wine, but the rice recipe called for white and the Oak Grove Chardonnay was very nice. Just not as good as the Rex Goliath Merlot that we polished off instead.


The ingredients in the Cabernet Cake bottle were flour, coconut, vanilla (and a few other more scientific ingredients that shall remain nameless) The leftover Oak Grove Chardonnay had a nice tropical fruit essence, with vanilla tones. I thought that these two products would merge well together. (And then I could enjoy a whole bottle of Cabernet with my cake)


First, let me note that while the packaging for this cake mix was, indeed, creative. Removing the cake mix through the narrow neck of this bottle was not easy. It took forever and a mix of techniques to extract the goods- for this reason alone I do not recommend this product! The rest of the cake was fairly easy though: a little chardonnay wine, a few eggs, water and canola oil and...voila...chardonnay cake. I believe you could easily modify a simple butter cake recipe and achieve the same result. (maybe better, even). The cake was moist and rich and the flavor was very vanilla-like.


I topped the cake with a mix of tropical fruit. This was a Del Monte jarred product containing passionfruit, pineapple, mango and papaya (lightly sweetened with sugar and passion fruit juice). The fresh tropical fruit at our local grocer was overpriced and didn't look good. I drained the fruit, added some brown sugar and the rest of the chardonnay and brought the mix to a boil. I threw in a few bananas as it cooled.


A dollop of whipped heavy whipping cream flavored with a bit of vanilla and just a pinch of sugar balanced the sweetness of the dessert. A final sprinkle of toasted coconut and we couldn't wait to dig in. A very nice dessert.

Friday, August 14, 2009

Daring Cook N: August Daring Cook's Challenge: Rice with Mushrooms, Cuttlefish and Artichokes


Oh my goodness did we dine well this evening!

Disclaimer for Jake: No cuttlefish were harmed in the creation of this wonderful Spanish dinner. I used squid and shrimp in its place, because I know that you have a soft spot in your heart for those cuddley cuttlefish.

Now, on to dinner....
This was fabulous! It was so good that I immediately felt like speaking Spanish as I was eating it. Making this dish was also a great opportunity for to try a few new things in the kitchen, which is the whole goal of the Daring Kitchen community. To learn more about the Daring Kitchen, click on the link at the right side of my post.

The host for August's Daring Cook Challenge is Olga from Olga's Kitchen. Click on Olga's link for the full recipe.

I enjoyed preparing this dish because many elements of the preparation were new to me. It made my house smell great and it challenged me to use some ingredients that I had not used before.
For instance, I had never heard of "sofriget" before, even though I am sure that I HAVE made that before. Essentially, this is a mixture of fresh tomatoes, garlic, onions and olive oil simmered until all the vegetables are soft. Other vegetables can be added as well. The recipe called for the addition of green pepper and a bayleaf. Isn't it pretty? It smelled good too!

The next step was something I had heard of, but had the courage to try before: cooking squid.
I used frozen squid- which worked fine for this recipe. (Someday I will disect my own - but in the interest of time and effort, frozen squid will do) The actual recipe called for cuttlefish, but ever since my son told me how awesome these creatures are...well, I just didn't have the heart (although I am a bit curious about how these might taste)...and SQUID? well, squid are just ugly little sea creatures that taste good...so they seemed like a logical substitution.

Squid was also suggested by Olga as a viable substitute as well, and she seemed to be spot on about a lot of things related to this dish.


I followed Olga's recipe, but added a few of my own special touches. I chopped some chorizo sausages (the spanish salami type, not the mexican ground stuff) and added some shrimp to the mix.
Olga added two recipes for garlic aiolli- one traditional, and one modern. The aiolli is served along side the rice and adds a new dimension to the rich tomatoey flavor of the dish.
I took the opportunity of having squid in the house to prepare some calimari (easy, easy, easy!) Just dredged the remaining squid in flour and dropped in hot oil. A little salt and pepper and a sprinkling of paprika and we were good to go. (oh, the manchego, chorizo and olives were also nice.)
This dish paired well with a nice green salad and a bottle Oak Grove Chardonnay. Muy Bueno!

Wednesday, August 12, 2009

Wobbly Wine Wisdom Wednesday: Ne Pas Brett, Si'l vous plait


As mentioned a few posts ago....we attended a tres magnifique wine tasting at our friend Jeff's home. We were asked to bring an amuse bouche and a bottle of French wine to sample.
So, Simon and I pranced over to our local Central Market and picked up a random bottle of Burgundy. We grabbed our strawberry amuse bouche, and gallyvanted off to the party.
You will certainly be impressed to learn that I cannot- for the life of me- recall the name of this wine now! Yet, I have decided to boldy go forth and blog about it anyway. (We make our own rules here on Wobbly Wine Wisdom Wednesday and I felt the message was too important to not share).
The name is forgotten, but the label is very much engrained in my head due to its very odd sketch of a rabbit....or a lady- I could not tell which one -and the name was something like "dame noire", but I could not find it on line to confirm that either.
While I would love to at least give you a heads up, I am pleased that we will not be advertising here, as I am convinced that the burgundy we bestowed on this lovely event was the worst of show.....ever....in the history of all wine tastings our little wine group has ever experienced. (thank god for the strawberries amuse bouche!)

Our bottle of Burgundy was a complete (and utter) disappointment. I poured myself a glass, gave it a quick swirl, admired its legginess and then stuck my nose in the glass. It smelled of pure foulness! A fragrance of barnyard so shocking that I dare tell you I had to smell it again several times just to be sure that I was not imagining it!
And then I passed the bottle around for confirmation! Simon had a whiff, our friend Dave had a whiff and so did his wife, Carol, Todd and Jeff both took a smell, and while they did not all agree that the scent was "manure-ish", a few other unsavory terms were thrown about..."musty" and "like livestock" and a very kind "earthy"

Now, the first thing I considered was that perhaps I got a bad bottle (okay that was apparent), but we were experiencing a heat wave in Seattle last week and we had struggled to keep our non-airconditioned home cool. In fact on a few days last week our home was quite heated and it was my fear that perhaps our growing wine collection might have been spoiled from the temp.

(An aside: Heat can destroy wine. Many people store thier wine in a rack or cupboard above thier refrigerator. This is a bad place to store wine because it tends to be warm up there.)
I did a little research (which did include a desperate tasting of a few more bottles of our own wine to ensure that they had survived the heat wave) and I learned that several wineries in the French Burgundy and Bordeaux regions are afflicted (this may be a harsh term to use) with a naturally occuring yeast called Brettanomyces or "Brett" for short.
There is much discussion on whether or not Brett is a sign of traditional and pure wine technique, or the just the simple result of poor hygiene. You can read more about this here .
Brett is not harmful, in fact, a small amount of Brett is credited as being essential for good fermentation and is attributed to the success of some of the best wines in the world.

If you plugged your nose while sipping, the flavor of the burgundy was actually not bad. Sometimes too much Brett can make a wine taste metallic or as foul as it smells.
While Brett is common in some French wineries, of about 10 bottles available for tasting that evening. ours was the only one with the stench. There really was not a terrible one in the bunch if you removed ours from the mix.
My favorite wine of the evening was Chateau Nenine (if we must have a wine touted in my post). Several others commented favorably on it as well. Another observation, ours was the only bottle without a chateau on the label-which is no guarantee against Brettanomyces, but may guide you in your future selection.

Monday, August 10, 2009

A Few Marvelous Things: Just a few things I have been thinking about...


Marvelous Date: Simon and I got dressed up and went out on a date on Saturday. We try to do this on the second Saturday of each month. I think it is good to get out for a romantic evening alone on a regular basis. It doesn't have to be an expensive night out either- the importance is on being together more than on what you do. We took the opportunity of using a gift card that my aunt and uncle gifted us for graduation to have a nice meal out and we caught a matinee of Julie & Julia.


Marvelous Movie: Julie and Julia was as good as I expected. Funny and charming and who can't identify with a story about being in a rut and wanting to do something remarkable that you are passionate about? Simon pulled out my Julie Child's Entertainment cookbook and started to pick our several challenging dishes he thought he might like to taste...he was also asking if I need the Mastering the Art of French Cooking cookbooks (I do!)
Marvelous Book: In all my spare time lately, I have managed to fit in a few good books as well. My favorite recent read was "The Sharper Your Knife, The Less You Cry" by Kathleen Flynn. This is the true life account of a woman who follows her dream of attending Le Cordon Bleu in Paris. I love to read about people following thier dreams and challenging themselves and this book did not disappoint. There are also great recipes at the end of each chapter- which I thought was a pleasant little bonus.


Marvelous Idea: Girls Night Out. On Thursday, two girlfriends and I are finally going to attend a cooking class at the Pacific Culinary Studio. I have wanted to do this for some time now, so I am quite looking forward to it. The topic is Sangria and Tapas. I will be sure to post a recipe of two from that.

Saturday, August 1, 2009

Keep It Simple Saturday: Strawberries & Marscapone Amuse Bouche


We attended an annual wine tasting soiree last night at the home of our friend Jeff. The theme was French, and Jeff asked each guest to bring a bottle of French wine and an "amuse bouche".

Amuse Bouche is french for "amuse mouth" (per Yahoo Babelfish). I have also seen it defined as a "palate teaser"

Amuse Bouche should be a bit heartier than an appetizer- one or two bites of a gourmet miniature is the intent. And presentation is essential. While it is often served at the beginning of a meal, many chefs are daring to amuse the mouth in between other courses as well.

I pondered the downsizing of several of my specialties before settling on stuffed strawberries. We have been in the midst of a serious heatwave up here in Seattle (where most people cannot rationalize buying an airconditioner for the two weeks we are treated to summer in average years) The last thing I wanted to do was heat up the oven. When I came across flats of beautiful strawberries at Central Market on Saturday morning, I immediately knew that my amuse bouche would have to include framboise.

I have made stuffed strawberries previously, but this is the first time I used marscapone cheese instead of cream cheese. The result was magnificent. The recipe is simple (a good candidate for this post) and the results are elegant.

Strawberries stuffed with Marscapone

(makes 12)

4 oz Marscapone cheese
1/2 tsp superfine sugar
A few drops of vanilla
12 Strawberries

Optional: grated good quality dark chocolate, small mint leaves, fine ground vanilla wafers, a sliver of almond...let me know if you think of something else!

For best appearance, prepare just an hour or two before you serve them.
  1. Cut a small slice off the bottom of each strawberry so that they can stand on thier own.
  2. Using a paring knife, or a strawberry "huller" , cut around the stem and scoop out the top of the strawberry to form a little strawberry cup. (I have a pampered chef one and it makes the job super easy)
  3. Mix together the marscapone, sugar and vanilla. Chill the mixture-this is optional- I just found that it pipes better cold.
  4. Using a pastry bag, (a plastic bag with a clipped corner works well too), fill each strawberry with the marscapone mixture.
  5. Sprinkle top of each strawberry with a pinch of grated dark chocolate and a small mint leaf.

I have also used cream cheese in place of the marscapone in the past which provided a bit of a cheese cake effect. This is especially good with a sprinkling of vanilla wafer. Or add almond extract to the cheese mixture and top each with an almond slice.

If you don't want to go to all that trouble to make it pretty, this is another one of those great little combos that make a great informal snack over the kitchen sink. Simon and I polished off the leftover marscapone and strawberries tonight in that very fashion. Delicious.

Wednesday, July 29, 2009

Wobbly Wine Wisdom Wednesday: Sweet Pea Apple Wine


My sister was in town last weekend to help me prepare for an estate sale and to paint our stepdad's condo. I have not had a girl weekend with my little sister since she was pregnant with her 2nd son, almost 9 years ago.


We decided that sorting and pricing sale items on a muggy Friday night would go much smoother with a little libation. I pulled out the oversized wine glasses that my stepdad had provided to me years before and we settled on a lovely bottle of Sweet Pea Apple Wine.


Never one to pass up a cute wine label with a catchy name, the apple wine appealed to me for a few reasons- first because we were practically raised in an apple orchard, so sentimentality won me over, and second because I was looking for something summery, cool, crisp and light. I was not at all disappointed.


Sweet Pea Apple Wine is two parts apple and one part peach. You can taste just that in this wine. It reminded me of hard cider without the kick. My sister said she was reminded of martinellis sparkling apple juice without the carbonation. We agreed that it was the perfect wine for our evening. I would definately recommend it for when the girlfriends get together- it is just that kind of drink; very feminine.


I think that this wine would go well with English Digestive crackers and marscapone. It would pair well with a nice salty pork roast or seasoned chicken breast. I served it chilled over crushed ice while enjoying time with my sister-probably the best combination of all.

Saturday, July 25, 2009

Keep It Simple Saturday: Greek Kapotenia (Carrot Truffles)


This post is for my brother, Dennis. I have been promising to share this recipe with him for a while now. I encountered this sweet carrot macroon while thumbing through Vefa's Kitchen cookbook "the bible of Greek cooking".


This is a great simple recipe (although a little more involved than eating cherries and chevre over the sink). The flavor is very macroon like- I think that your tasters will be surprised to realize that this contains carrots. The recipe is unique and makes a great little presentation.
KAPOTENIA
1lb, 2 oz medium carrots
1c superfine sugar
finely grated zest of 1 large lemon
1t vanilla extract
2-1/3 - 3-2/3 c dried unsweetened dessicated coconut (I used Red Mill)
  1. Parboil the carrots for 20 minutes, then remove from the heat, drain, cool and then grate coarsely.
  2. Combine grated carrots, sugar and lemon zest in a pan and cook, stirring frequently for 20 minutes
  3. Remove from heat and cool slightly. Add vanilla and half the coconut. Mix well.
  4. Let cool completely and refrigerate for 30 minutes.
  5. Shape into 1 inch balls and roll each in the remaining coconut. (If they don't hold together well, add more coconut)
  6. Put the truffles in candy cases and store in air tight container in the refrigerator until ready to serve.

A final note about carrots: I recently came across some yellow and purple carrots at the Snohomish farmer's market- I am always intrigued by unique veggies, so I had to buy. I learned later that these funky colors are not so unique, but more representative of ancient carrots. Today these are mostly engineered to enhance nutrient values and flavor (I guess most veggies fall in that catagory that aren't heirloom). I am not sure how I feel about having scientists messing about with my veggies. Today's popular orange carrots are a true product of scientist intervention. I read that the beta carotene content in today's carrots in 25% greater than 20 years ago.

Surprisingly someone has devoted a whole website to the subject of carrots, if you are interested in learning more about carrot history, check it out here: www.carrotmuseum.co.uk/history.html